
Introduction
When it comes to classic desserts, Oreo cheesecakes have always been a fan favorite. But what if you could take that rich, creamy cheesecake and combine it with the irresistible crunch of an Oreo cookie, all in a bite-sized, individual form? Enter the Mini Oreo Cheesecakes—a decadent treat that offers the perfect balance of smooth, tangy cheesecake filling and crunchy, chocolatey Oreo cookie crust. These mini cheesecakes are perfect for parties, special occasions, or whenever you crave a small indulgence without the guilt of an entire cheesecake!
What makes this recipe even better is that it’s Halal-friendly. The ingredients used are free from any pork or alcohol, so everyone can enjoy these delicious treats. Whether you’re a cheesecake lover or an Oreo enthusiast (or both!), these Mini Oreo Cheesecakes will quickly become your go-to dessert. In this article, we’ll walk you through the steps to create these delectable mini cheesecakes, share tips for perfecting the recipe, and explore different variations to make these treats your own.
Why You’ll Love This Recipe
- Perfectly Portable: These mini cheesecakes are individual-sized, making them easy to serve at parties, picnics, or potlucks. No need to worry about slicing up a whole cheesecake!
- Crunchy and Creamy Combo: The contrast between the crunchy Oreo crust and the smooth, creamy cheesecake filling is nothing short of divine.
- Customizable: While this recipe calls for classic Oreos, you can experiment with different Oreo flavors or add toppings like whipped cream, fruit, or chocolate drizzle for extra flair.
- Halal-Friendly: This recipe uses only Halal-certified ingredients, so it can be enjoyed by everyone without any dietary concerns.
- Easy to Make: Despite looking and tasting like an indulgent treat, these mini cheesecakes are surprisingly easy to prepare, requiring just a few simple ingredients and minimal effort.
Preparation Time and Servings
- Total Time: 4 hours (30 minutes for prep, 30 minutes for chilling, 1 hour for baking, 2 hours for cooling)
- Servings: This recipe yields 12 mini cheesecakes.
- Nutrition Facts (per serving): Calories: 350, Protein: 5g, Carbs: 35g, Fat: 23g.
Ingredients
For the Crust:
- 24 Oreo cookies (Halal-certified): The base of the crust. You can use regular Oreos, or if you want a twist, try using Golden Oreos or any other favorite variety.
- 5 tablespoons unsalted butter: Melted, to bind the cookie crumbs together and create a firm, crunchy crust.
- Pinch of salt: To balance the sweetness of the cookies.
For the Cheesecake Filling:
- 3 (8 oz) packages cream cheese (softened): The main ingredient for the creamy cheesecake filling.
- 1 cup granulated sugar: To sweeten the cheesecake filling.
- 1 teaspoon vanilla extract: Adds a delicious depth of flavor to the filling.
- 3 large eggs (room temperature): Helps to create a smooth, creamy texture.
- 1 cup sour cream: Adds creaminess and a slight tang, which balances the sweetness.
- 2 tablespoons all-purpose flour: Helps stabilize the filling and prevents cracking during baking.
- 12 whole Oreos (for the filling): These crushed Oreos will add texture and flavor to the cheesecake filling.
Optional Toppings:
- Whipped cream: For a light and airy topping.
- Crushed Oreos: For garnishing the top of each mini cheesecake.
- Chocolate drizzle: For an extra indulgent touch.
- Fresh berries: Strawberries, raspberries, or blueberries for a burst of freshness.
First Step: PREPARE THE CRUST
- Crush the Oreos: Start by crushing the 24 Oreo cookies into fine crumbs. You can do this by placing the cookies in a zip-top bag and smashing them with a rolling pin, or use a food processor for quicker results. The finer the crumbs, the better the crust will hold together.
- Mix with Butter: In a medium bowl, combine the crushed Oreos with the melted butter and a pinch of salt. Stir until the mixture resembles wet sand and all the cookie crumbs are evenly coated with butter.
- Press the Crust: Line a 12-cup muffin tin with paper liners. Divide the Oreo mixture evenly among the 12 cups, pressing the crumbs into the bottom to form a firm crust. Use the back of a spoon to press down firmly, ensuring the crust holds together when baking.
- Pre-Bake the Crust: Preheat your oven to 325°F (163°C). Bake the crusts for about 5-7 minutes, or until they are set and slightly golden. Remove the muffin tin from the oven and let the crusts cool while you prepare the cheesecake filling.
Second Step: PREPARE THE CHEESECAKE FILLING
- Beat the Cream Cheese: In a large mixing bowl, beat the softened cream cheese with an electric mixer until it’s smooth and creamy. Be sure to scrape down the sides of the bowl to ensure everything is well combined.
- Add the Sugar: Add the granulated sugar and continue mixing until fully incorporated. The mixture should be smooth and fluffy.
- Incorporate the Eggs: Add the eggs, one at a time, mixing well after each addition. Scrape down the sides of the bowl as needed to ensure an even mixture. The eggs help provide structure to the cheesecake filling.
- Add the Sour Cream and Vanilla: Mix in the sour cream and vanilla extract. The sour cream adds a delicious tang and richness to the filling, creating a balance to the sweetness.
- Add the Flour: Sift in the flour and mix until well combined. The flour helps prevent cracks in the cheesecake and gives it a smooth, firm texture.
- Fold in Crushed Oreos: Gently fold in the crushed Oreos (12 whole cookies) into the cheesecake batter. These pieces will add texture and enhance the Oreo flavor in the filling.
Third Step: FILL AND BAKE
- Fill the Muffin Tin: Spoon the cheesecake filling into the muffin tin, dividing the mixture evenly between the 12 cups. Use a spoon or spatula to smooth the tops of the cheesecakes.
- Bake the Cheesecakes: Bake the mini cheesecakes in the preheated oven at 325°F (163°C) for 18-20 minutes. The cheesecakes should be set around the edges but slightly jiggly in the center. Don’t worry if they seem a little soft in the middle—it will firm up as they cool.
- Cool the Cheesecakes: Turn off the oven and leave the cheesecakes in the oven with the door slightly ajar for 1 hour. This gradual cooling helps prevent cracking. After an hour, transfer the cheesecakes to a wire rack to cool completely at room temperature.
Fourth Step: CHILL AND SERVE
- Chill the Mini Cheesecakes: Once the mini cheesecakes have cooled to room temperature, transfer the muffin tin to the refrigerator. Let the cheesecakes chill for at least 2 hours, or preferably overnight, to allow them to fully set and firm up.
- Garnish and Serve: Before serving, you can top each mini cheesecake with whipped cream, crushed Oreos, chocolate drizzle, or fresh berries for extra flavor and a beautiful presentation.
- Serve: Carefully remove the cheesecakes from the muffin tin liners, plate them, and enjoy! These mini cheesecakes are perfect for a sweet snack, dessert for a party, or a treat for yourself.
How to Serve Mini Oreo Cheesecakes
Mini Oreo Cheesecakes are versatile and perfect for various occasions. Here are some ideas for serving:
1. At Parties or Gatherings
Mini Oreo Cheesecakes are perfect for parties, gatherings, or potlucks. They’re easy to serve and allow everyone to enjoy a personal-sized portion of this delicious dessert. Pair them with a refreshing beverage like iced tea, lemonade, or even coffee for a complete dessert experience.
2. As an Individual Dessert
Because these cheesecakes are served in individual portions, they’re ideal for those who prefer a small, satisfying dessert. They’re perfect for portion control and make for a great treat after dinner without being too overwhelming.
3. As a Gift
If you’re looking for a unique homemade gift, mini cheesecakes are a great option. Simply package them in small boxes or gift bags, and they’ll make a thoughtful, delicious present for friends and family.
4. For Special Occasions
Mini Oreo Cheesecakes make an excellent choice for special occasions like birthdays, holidays, or anniversaries. Their elegant appearance and rich flavor will make them the star of any dessert table.
Recipe Variations
While the classic Oreo mini cheesecake is incredible, there are many ways to personalize this dessert to suit your taste preferences. Here are some variations you can try:
1. Try Different Oreo Flavors
Experiment with different Oreo varieties for the crust or the filling. Use Golden Oreos for a lighter, vanilla-flavored cheesecake or try mint Oreos for a refreshing twist.
2. Add Fruit or Nuts
Top the cheesecakes with fresh fruit like strawberries, raspberries, or even a few slices
of banana for added texture and flavor. Chopped nuts like almonds or hazelnuts can also be added to the crust or used as a topping for extra crunch.
3. Make It Gluten-Free
To make these cheesecakes gluten-free, simply use gluten-free Oreos for the crust and make sure to use a gluten-free flour alternative in the cheesecake filling.
Tips for Perfect Mini Oreo Cheesecakes
- Use Room Temperature Ingredients: Make sure your cream cheese and eggs are at room temperature before mixing. This ensures a smooth, lump-free filling.
- Don’t Overmix the Filling: Overmixing can cause air bubbles that might lead to cracks in the cheesecake as it bakes. Mix until just combined.
- Chill the Cheesecakes: Allow the cheesecakes to chill for a few hours or overnight to allow the flavors to meld and the texture to firm up.
- Gently Remove from Muffin Tin: Let the cheesecakes cool completely before removing them from the muffin tin liners. This will prevent them from sticking or falling apart.
Mini Oreo Cheesecakes: A Delicious Twist on a Classic Favorite
- Total Time: 1 hour and 30 minutes
Description
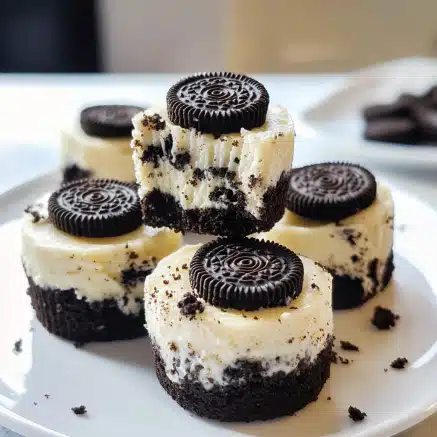
These Mini Oreo Cheesecakes are the perfect bite-sized treat, featuring a rich and creamy cheesecake filling atop a crunchy Oreo cookie crust. With a whole Oreo nestled in the center, each mini cheesecake delivers the perfect balance of sweetness and crunch. Ideal for parties, celebrations, or a fun dessert for any occasion, these individual cheesecakes are sure to satisfy your sweet tooth. Simple to make and absolutely irresistible!
Ingredients
For the Crust:
- 24 Oreo cookies (Halal-certified): The base of the crust. You can use regular Oreos, or if you want a twist, try using Golden Oreos or any other favorite variety.
- 5 tablespoons unsalted butter: Melted, to bind the cookie crumbs together and create a firm, crunchy crust.
- Pinch of salt: To balance the sweetness of the cookies.
For the Cheesecake Filling:
- 3 (8 oz) packages cream cheese (softened): The main ingredient for the creamy cheesecake filling.
- 1 cup granulated sugar: To sweeten the cheesecake filling.
- 1 teaspoon vanilla extract: Adds a delicious depth of flavor to the filling.
- 3 large eggs (room temperature): Helps to create a smooth, creamy texture.
- 1 cup sour cream: Adds creaminess and a slight tang, which balances the sweetness.
- 2 tablespoons all-purpose flour: Helps stabilize the filling and prevents cracking during baking.
- 12 whole Oreos (for the filling): These crushed Oreos will add texture and flavor to the cheesecake filling.
Optional Toppings:
- Whipped cream: For a light and airy topping.
- Crushed Oreos: For garnishing the top of each mini cheesecake.
- Chocolate drizzle: For an extra indulgent touch.
- Fresh berries: Strawberries, raspberries, or blueberries for a burst of freshness.
Instructions
First Step: PREPARE THE CRUST
- Crush the Oreos: Start by crushing the 24 Oreo cookies into fine crumbs. You can do this by placing the cookies in a zip-top bag and smashing them with a rolling pin, or use a food processor for quicker results. The finer the crumbs, the better the crust will hold together.
- Mix with Butter: In a medium bowl, combine the crushed Oreos with the melted butter and a pinch of salt. Stir until the mixture resembles wet sand and all the cookie crumbs are evenly coated with butter.
- Press the Crust: Line a 12-cup muffin tin with paper liners. Divide the Oreo mixture evenly among the 12 cups, pressing the crumbs into the bottom to form a firm crust. Use the back of a spoon to press down firmly, ensuring the crust holds together when baking.
- Pre-Bake the Crust: Preheat your oven to 325°F (163°C). Bake the crusts for about 5-7 minutes, or until they are set and slightly golden. Remove the muffin tin from the oven and let the crusts cool while you prepare the cheesecake filling.
Second Step: PREPARE THE CHEESECAKE FILLING
- Beat the Cream Cheese: In a large mixing bowl, beat the softened cream cheese with an electric mixer until it’s smooth and creamy. Be sure to scrape down the sides of the bowl to ensure everything is well combined.
- Add the Sugar: Add the granulated sugar and continue mixing until fully incorporated. The mixture should be smooth and fluffy.
- Incorporate the Eggs: Add the eggs, one at a time, mixing well after each addition. Scrape down the sides of the bowl as needed to ensure an even mixture. The eggs help provide structure to the cheesecake filling.
- Add the Sour Cream and Vanilla: Mix in the sour cream and vanilla extract. The sour cream adds a delicious tang and richness to the filling, creating a balance to the sweetness.
- Add the Flour: Sift in the flour and mix until well combined. The flour helps prevent cracks in the cheesecake and gives it a smooth, firm texture.
- Fold in Crushed Oreos: Gently fold in the crushed Oreos (12 whole cookies) into the cheesecake batter. These pieces will add texture and enhance the Oreo flavor in the filling.
Third Step: FILL AND BAKE
- Fill the Muffin Tin: Spoon the cheesecake filling into the muffin tin, dividing the mixture evenly between the 12 cups. Use a spoon or spatula to smooth the tops of the cheesecakes.
- Bake the Cheesecakes: Bake the mini cheesecakes in the preheated oven at 325°F (163°C) for 18-20 minutes. The cheesecakes should be set around the edges but slightly jiggly in the center. Don’t worry if they seem a little soft in the middle—it will firm up as they cool.
- Cool the Cheesecakes: Turn off the oven and leave the cheesecakes in the oven with the door slightly ajar for 1 hour. This gradual cooling helps prevent cracking. After an hour, transfer the cheesecakes to a wire rack to cool completely at room temperature.
Fourth Step: CHILL AND SERVE
- Chill the Mini Cheesecakes: Once the mini cheesecakes have cooled to room temperature, transfer the muffin tin to the refrigerator. Let the cheesecakes chill for at least 2 hours, or preferably overnight, to allow them to fully set and firm up.
- Garnish and Serve: Before serving, you can top each mini cheesecake with whipped cream, crushed Oreos, chocolate drizzle, or fresh berries for extra flavor and a beautiful presentation.
- Serve: Carefully remove the cheesecakes from the muffin tin liners, plate them, and enjoy! These mini cheesecakes are perfect for a sweet snack, dessert for a party, or a treat for yourself.
- Prep Time: 30minutes
- Cook Time: 1 hour
Nutrition
- Serving Size: 12
- Calories: 350 kcal
- Fat: 23g
- Carbohydrates: 35g
- Protein: 5g
Conclusion
Mini Oreo Cheesecakes are a must-try dessert for anyone who loves the creamy, tangy goodness of cheesecake combined with the beloved crunch of Oreo cookies. These mini treats are perfect for parties, special occasions, or just when you need a little indulgence. With their Halal-friendly ingredients and endless customization options, they’re a dessert everyone can enjoy. Try this recipe today, and treat yourself to a sweet, Oreo-filled delight!