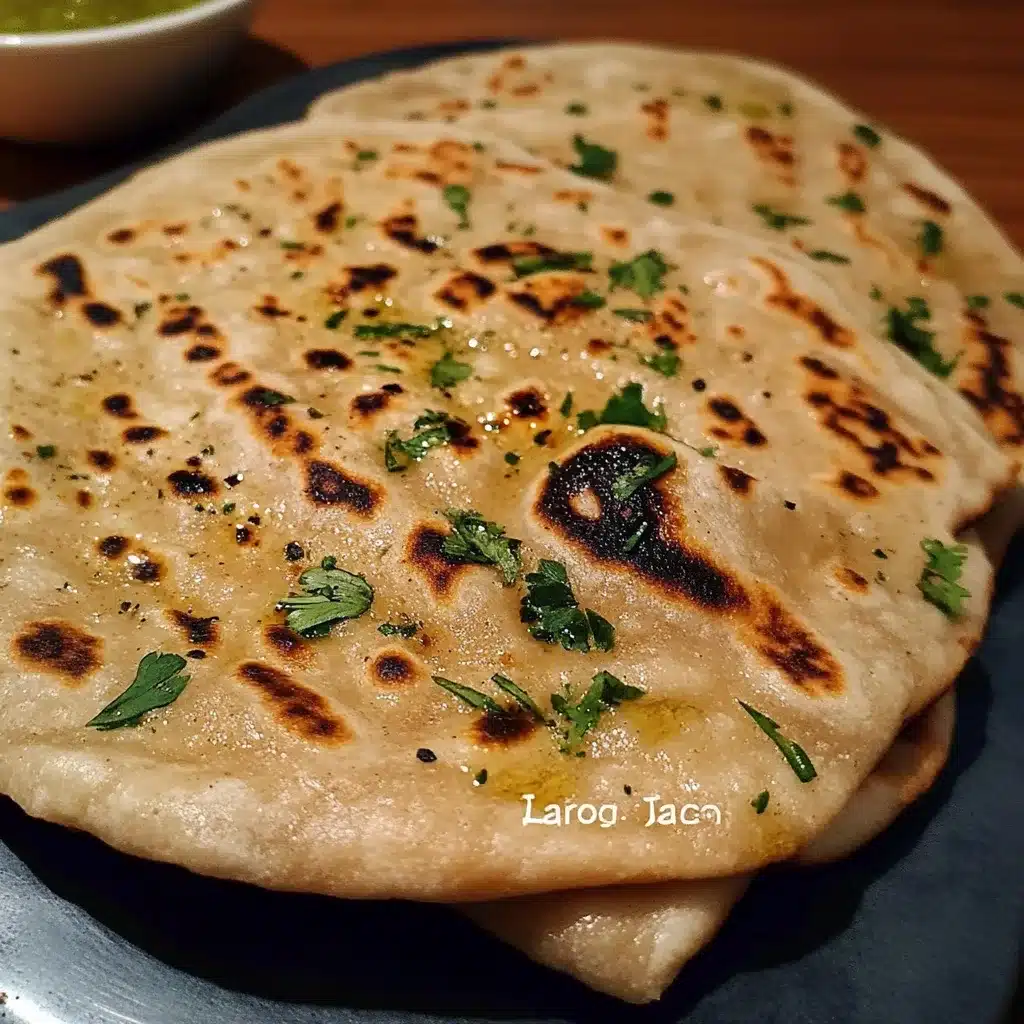
Roti, a traditional Indian flatbread, is a staple in many households across the subcontinent. This amazing recipe guides you through making soft, delicious rotis without any yeast. Not only is it simple, but it also requires minimal ingredients, allowing you to whip up these incredible flatbreads in no time. Whether paired with curries, gravies, or enjoyed with just a smear of butter, rotis are versatile and complement any meal.
The beauty of roti lies in its adaptability. You can customize it to suit your taste or dietary preferences. This recipe will empower you to create soft and pliable rotis that can elevate any dish. Picture yourself sitting at the table, dipping a warm roti into a bowl of savory curry, and feeling satisfied with each bite.
Preparing roti becomes an enjoyable experience, especially when you master the art of rolling it out to the perfect thickness. In this detailed guide, you will discover why this recipe stands out, how to prepare it, and tips to serve your delicious homemade rotis. Let’s dive into this wonderful culinary journey!
Why You’ll Love This Recipe
This Incredible Roti recipe stands out for several reasons, making it a must-try for anyone looking to step into the world of Indian cooking:
1. No Yeast Needed – You do not need yeast for this recipe, which means no waiting for the dough to rise.
2. Simple Ingredients – Most of these ingredients are basic pantry staples, making it accessible for everyone.
3. Quick to Prepare – With minimal prep and cooking time, you can enjoy fresh rotis quickly.
4. Fluffy Texture – When made correctly, each roti can be fluffy and soft, making them delightful to eat!
5. Versatile – Serve them with a variety of dishes, from savory to sweet; complement with vegetables, lentils, or even jams.
6. Healthy Choice – Made from whole wheat or multi-grain flours, they’re often healthier than store-bought options.
With these incredible benefits in mind, it’s clear why this recipe for roti is popular and cherished by families everywhere!
Preparation and Cooking Time
Creating Roti requires minimal time. Here’s a breakdown for planning your cooking session:
– Preparation Time: 10-15 minutes
– Cooking Time: 15-20 minutes
– Total Time: Approximately 30-35 minutes
These times can vary slightly depending on your experience level, but this gives you a solid estimate for preparing and enjoying fresh rotis.
Ingredients
– 2 cups whole wheat flour (atta)
– ¾ cup water (or as needed)
– 1 tsp salt (optional)
– 1 tbsp oil (optional for softer rotis)
– Extra flour for dusting
Step-by-Step Instructions
Making Roti is straightforward, and following these simple steps will yield delicious results:
1. Mix Dry Ingredients: In a mixing bowl, combine the whole wheat flour and salt. Mix well to distribute the salt evenly.
2. Make the Dough: Gradually add water to the flour mixture. Mix with your hands until a rough dough forms.
3. Knead the Dough: Transfer the dough onto a clean surface. Knead for about 5-7 minutes until it becomes smooth and elastic. You can add a teaspoon of oil during kneading for added softness.
4. Rest the Dough: Cover the dough with a damp cloth and let it rest for at least 15-20 minutes. This helps the gluten relax and makes rolling easier.
5. Divide the Dough: Once rested, divide the dough into small, equal-sized balls (about the size of a golf ball).
6. Roll Out the Roti: On a floured surface, take one dough ball and flatten it slightly. Using a rolling pin, roll it out into a round disc, approximately 6-8 inches in diameter, keeping it as even as possible. Dust lightly with flour to avoid sticking.
7. Cook the Roti: Heat a tava (griddle) over medium-high heat. Once hot, place the rolled roti on the tava.
8. First Flip: Cook for about 30-40 seconds until you see bubbles forming on the surface, then flip it over.
9. Puffing the Roti: Press gently with a spatula, encouraging it to puff up. Cook for another 30 seconds or until brown spots appear.
10. Final Touch: Flip the roti again, and if desired, apply a little oil or ghee on one side while cooking. This adds flavor and moisture.
11. Transfer to a Plate: Once cooked, transfer the roti to a plate and cover with a clean cloth to keep it warm and soft. Repeat with the remaining dough balls.
These step-by-step instructions will guide you in creating perfect rotis every time effortlessly.
How to Serve
Serving your freshly made Roti can enhance the dining experience significantly. Here are a few suggestions:
1. Accompany with Curries: Serve hot rotis with a bowl of your favorite curry, lentil dish, or dry subzi (vegetable).
2. Add Condiments: Consider adding sides like mango chutney, yogurt, or pickles to elevate flavor profiles.
3. Break and Share: Encourage family and friends to break off pieces to share, fostering a communal dining experience.
4. Consider Sides: Rotis also pair wonderfully with dals (lentils) or even as a wrap for various fillings.
5. Presentation: Stack warm rotis in a breadbasket lined with a cloth for an appealing presentation at the table.
By serving them with care and thoughtfulness, you’ll make each meal memorable and delightful for all involved. Enjoy your culinary adventure with Roti!
Additional Tips
– Use Warm Water: Using warm water for the dough can help make your rotis softer and easier to work with.
– Don’t Rush the Resting Time: Allowing the dough to rest is crucial. It improves pliability and makes rolling easier.
– Roll Evenly: Aim for an even thickness when rolling out your rotis. This ensures uniform cooking and puffing.
– Experiment with Cooking Surface: If you don’t have a tava, a non-stick frying pan will also work well.
– Keep Rotis Warm: If you make a large batch, stack them and cover them with a towel to retain heat and moisture.
Recipe Variation
Feel free to get creative! Here are a few variations you can try:
1. Spiced Roti: Add spices such as cumin or ajwain (carom seeds) to the flour before mixing with water for additional flavor.
2. Herbed Roti: Incorporate finely chopped herbs like cilantro or spinach into the dough for a fresh twist.
3. Stuffed Roti: Create stuffed rotis by adding a filling of mashed potatoes, paneer, or cooked vegetables before rolling them out.
4. Multigrain Roti: Substitute some whole wheat flour with flours like millet, barley, or chickpea for a health boost and unique flavor.
Freezing and Storage
– Storage: Keep leftover rotis in an airtight container at room temperature for up to 2 days.
– Refrigeration: If you wish to extend their life, refrigerate rotis, and they will last up to a week. Reheat before serving.
– Freezing: Rotis can be frozen for up to 3 months. Layer parchment paper between them to prevent sticking, and store in a freezer-safe bag.
Special Equipment
You won’t need too much specialized equipment, but these items can streamline your cooking process:
– Tava or Griddle: Ideal for cooking rotis evenly.
– Rolling Pin: Essential for rolling out the dough to the desired thickness.
– Dough Scraper: Helpful for manipulating dough without getting sticky.
– Clean Cloth: To cover the rotis and keep them warm after cooking.
Frequently Asked Questions
How can I ensure my rotis puff up?
Make sure your tava is sufficiently hot and that you press down gently while cooking to encourage puffing.
Can I make the dough ahead of time?
Yes, you can prepare the dough and keep it covered in the refrigerator for up to 24 hours before use.
What should I do if the dough is too sticky?
If the dough is sticky, gradually incorporate a little more flour until it reaches the desired consistency.
Can I add more water to the dough than specified?
It’s best to start with the recommended amount of water and only add more if necessary, as too much can make the dough wet and hard to handle.
How do I know when the roti is cooked properly?
Look for brown spots and puffing; this indicates your roti has cooked through.
Conclusion
Roti (Indian flatbread, no yeast) is a delightful addition to any meal. Its versatility and simplicity make it a beloved staple in many cuisines. With this guide, you have all the tools and tips you need to create the perfect roti at home. So gather your ingredients, follow the steps, and enjoy the satisfaction of making this beloved bread from scratch. Each bite will transport you to the rich culinary traditions of India!

Roti (Indian Flatbread, No Yeast): The Incredible Ultimate Recipe You’ll Adore
- Total Time: 35 minutes
Ingredients
– 2 cups whole wheat flour (atta)
– ¾ cup water (or as needed)
– 1 tsp salt (optional)
– 1 tbsp oil (optional for softer rotis)
– Extra flour for dusting
Instructions
Making Roti is straightforward, and following these simple steps will yield delicious results:
1. Mix Dry Ingredients: In a mixing bowl, combine the whole wheat flour and salt. Mix well to distribute the salt evenly.
2. Make the Dough: Gradually add water to the flour mixture. Mix with your hands until a rough dough forms.
3. Knead the Dough: Transfer the dough onto a clean surface. Knead for about 5-7 minutes until it becomes smooth and elastic. You can add a teaspoon of oil during kneading for added softness.
4. Rest the Dough: Cover the dough with a damp cloth and let it rest for at least 15-20 minutes. This helps the gluten relax and makes rolling easier.
5. Divide the Dough: Once rested, divide the dough into small, equal-sized balls (about the size of a golf ball).
6. Roll Out the Roti: On a floured surface, take one dough ball and flatten it slightly. Using a rolling pin, roll it out into a round disc, approximately 6-8 inches in diameter, keeping it as even as possible. Dust lightly with flour to avoid sticking.
7. Cook the Roti: Heat a tava (griddle) over medium-high heat. Once hot, place the rolled roti on the tava.
8. First Flip: Cook for about 30-40 seconds until you see bubbles forming on the surface, then flip it over.
9. Puffing the Roti: Press gently with a spatula, encouraging it to puff up. Cook for another 30 seconds or until brown spots appear.
10. Final Touch: Flip the roti again, and if desired, apply a little oil or ghee on one side while cooking. This adds flavor and moisture.
11. Transfer to a Plate: Once cooked, transfer the roti to a plate and cover with a clean cloth to keep it warm and soft. Repeat with the remaining dough balls.
These step-by-step instructions will guide you in creating perfect rotis every time effortlessly.
- Prep Time: 15 minutes
- Cook Time: 20 minutes
Nutrition
- Serving Size: 6
- Calories: 118 kcal
- Fat: 0.5g
- Protein: 3g