Introduction
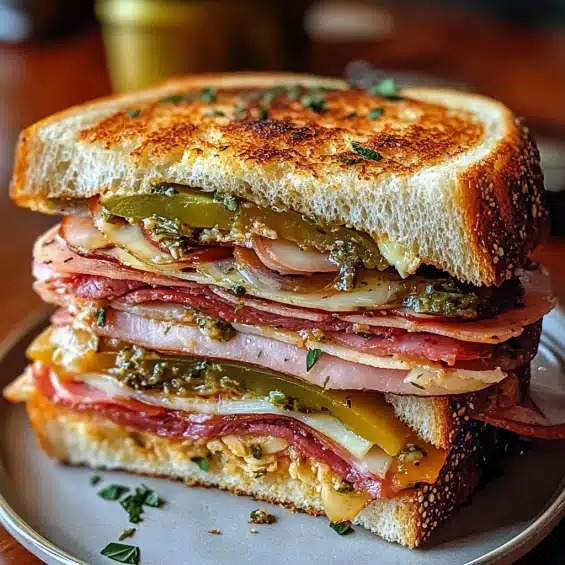
The Muffuletta Sandwich is a timeless classic in Italian-American cuisine, originally hailing from New Orleans but deeply inspired by the flavors of Italy. This sandwich is a beautiful fusion of various elements—freshly baked bread, a medley of Italian deli meats, cheese, and a savory, tangy olive salad. Its origin story traces back to the early 1900s, when Italian immigrants brought their culinary traditions to New Orleans. Over the years, the Muffuletta has become a staple, often found in delis and restaurants across the United States.
In this article, we will explore what makes the Muffuletta Sandwich so special, break down the steps to make a perfect version of this Italian-American creation, and provide tips, variations, and serving suggestions. Whether you’re a fan of Italian sandwiches or you’re looking to try something new, the Muffuletta is a must-try. This recipe is Halal friendly—free from pork, bacon, and wine—making it accessible to a broader audience without compromising on flavor.
Why You’ll Love This Recipe
- Classic Italian Flavors: The Muffuletta sandwich brings together all the best flavors of Italian cuisine, with ingredients like cured meats, cheeses, olives, and a tangy dressing.
- Customizable: This sandwich can be easily tailored to suit your preferences. You can swap out meats, choose different cheeses, or make the olive salad more or less tangy.
- Perfect for Parties or Picnics: Its hearty size and delicious flavors make it perfect for sharing with friends and family at gatherings, picnics, or even as a make-ahead lunch.
- A True Crowd-Pleaser: The combination of fresh bread, savory meats, sharp cheese, and briny olives creates a flavor explosion that’s impossible to resist.
- Halal-Friendly: This version avoids pork, bacon, and wine, making it suitable for those following a Halal diet.
Preparation Time and Servings
- Total Time: 45 minutes (25 minutes for preparation, 20 minutes for chilling)
- Servings: This recipe makes 4-6 servings, depending on how large you slice the sandwich.
- Nutrition Facts (per serving): Calories: 550, Protein: 20g, Carbs: 50g, Fat: 30g
Ingredients
For the Olive Salad:
- 1 ½ cups green olives: Pitted and chopped (use a variety like Castelvetrano or Kalamata for rich flavor).
- 1 cup black olives: Pitted and chopped.
- ½ cup roasted red peppers: Chopped, adding a sweet and smoky flavor.
- 1 small red onion: Finely chopped for a little sharpness.
- 2 tablespoons capers: For added brininess and flavor depth.
- 2 tablespoons fresh parsley: Finely chopped for a burst of color and freshness.
- 1 clove garlic: Minced, for aromatic depth.
- ¼ cup extra virgin olive oil: For dressing the salad.
- 2 tablespoons red wine vinegar: (Halal version: ensure no alcohol content) to balance the flavors.
- 1 teaspoon dried oregano: For an Italian herby kick.
- Salt and pepper: To taste.
For the Sandwich:
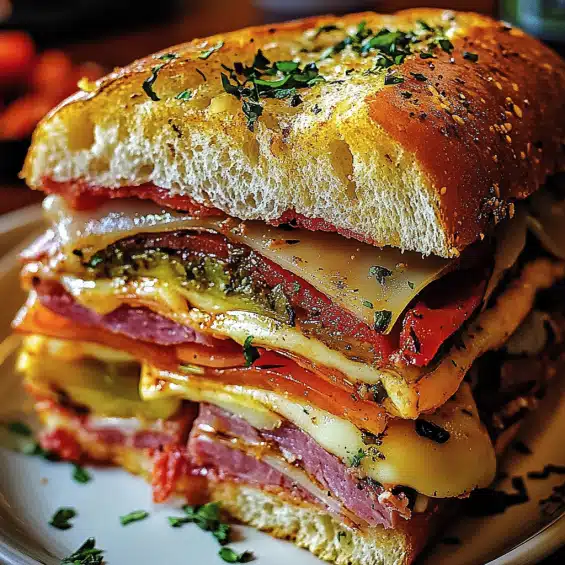
- 1 large round loaf of Italian bread: Preferably Muffuletta bread or any soft yet sturdy round bread like ciabatta or focaccia.
- ½ lb. halal deli turkey breast: Thinly sliced.
- ½ lb. halal deli roast beef: Thinly sliced.
- ½ lb. halal deli chicken breast: Thinly sliced.
- 8 oz. provolone cheese: Sliced.
- 8 oz. mozzarella cheese: Fresh, sliced or shredded.
- 1 tablespoon olive oil: For drizzling over the sandwich.
Optional Garnish:
- Extra parsley: For a fresh, green garnish.
- Additional olives or pickles: To serve on the side.
Step-by-Step Preparation
First Step: Prepare the Olive Salad
- Chop the Olives and Vegetables: Start by pitting and chopping both the green and black olives into small pieces. You want them to be small enough that they can evenly spread over the sandwich but large enough to maintain their texture.
- Add Red Peppers and Onion: Dice the roasted red peppers and finely chop the red onion. These add sweetness and tanginess to the olive salad, balancing the brininess of the olives and capers.
- Mix Ingredients: In a medium-sized mixing bowl, combine the chopped olives, red peppers, onion, capers, parsley, and garlic. Add the dried oregano to bring in that essential Italian flavor.
- Dress the Salad: Drizzle in the olive oil and red wine vinegar, tossing the mixture until everything is well coated. Season with salt and pepper to taste. The olive salad should have a bright, tangy, and savory flavor.
- Chill the Salad: For the best flavor, let the olive salad sit in the refrigerator for at least 20 minutes before assembling the sandwich. This gives the flavors time to meld together and enhances the overall taste.
Second Step: Prepare the Sandwich
- Slice the Bread: Begin by slicing your Italian bread in half horizontally. If your loaf is very large, you can also cut it into smaller portions. The bread should be sturdy enough to hold all the fillings without falling apart.
- Layer the Meats: Begin layering the deli meats on the bottom half of the bread. Start with the halal turkey breast, followed by the roast beef, and finish with the chicken breast. Try to spread the meats evenly so that each bite has a balanced mix of flavors.
- Add the Cheese: Lay the provolone cheese and mozzarella cheese on top of the meats. The cheese should completely cover the meats and form a creamy, melty layer once the sandwich is pressed.
Third Step: Assemble the Muffuletta
- Spread the Olive Salad: Spoon a generous amount of the prepared olive salad over the cheese layer, spreading it evenly to cover the sandwich. The olive salad is the star of the Muffuletta, and you want it to be plentiful so that every bite has the perfect balance of flavors.
- Top the Sandwich: Place the top half of the bread over the olive salad, pressing down gently to compact the sandwich. This will help the ingredients meld together as the sandwich chills.
Fourth Step: Press and Chill
- Press the Sandwich: To get that authentic Muffuletta experience, press the sandwich down with a heavy object (such as a cast-iron skillet or a foil-wrapped brick). You want to flatten the sandwich just slightly so that the flavors combine and the bread crisps up slightly.
- Chill the Sandwich: Wrap the sandwich in plastic wrap or parchment paper and refrigerate it for at least 20 minutes. This resting period allows the flavors to come together and ensures that the sandwich holds together when sliced.
Final Step: Slice and Serve
- Slice the Sandwich: After the sandwich has chilled, use a serrated knife to slice it into wedges or quarters. The sandwich can be cut into smaller portions if serving a large crowd or served as larger, hearty slices for a more substantial meal.
- Garnish and Serve: Optionally, sprinkle some fresh parsley on top for a pop of color. Serve with extra olives or pickles on the side for added flavor.
How to Serve the Muffuletta Sandwich
Muffuletta Sandwich is a versatile dish that can be served in a variety of settings, from casual picnics to more formal gatherings. Here are some great ideas on how to serve this flavorful sandwich:
1. Perfect for Picnics and Parties
The Muffuletta is ideal for large gatherings, picnics, or potlucks. Its robust flavors and hearty size make it an excellent choice for sharing among a crowd. Pair it with side dishes like pasta salad, chips, or roasted vegetables for a well-rounded meal.
2. As a Lunch or Dinner Option
The Muffuletta also works wonderfully as a lunch or dinner. It’s filling and satisfying, with a combination of proteins, cheese, and vegetables. You can serve it alongside a light soup or salad for a more balanced meal.
3. Serve with Wine or Mocktails
Pair the Muffuletta with a glass of white wine, such as Chardonnay or Sauvignon Blanc, or serve it with a refreshing mocktail like a sparkling lemon mint cooler for a non-alcoholic option. The fresh, tangy beverages complement the savory richness of the sandwich.
Recipe Variations
While the classic Muffuletta sandwich is fantastic on its own, there are several variations you can try to suit your personal taste:
1. Vegetarian Muffuletta
If you’re looking for a vegetarian version, simply skip the meats and load up the sandwich with more veggies and cheese. Roasted mushrooms, grilled zucchini, and eggplant can be great substitutes for the meat, and you can add extra mozzarella or feta for a more filling option.
2. Different Cheeses
While provolone and mozzarella are traditional choices for a Muffuletta, you can swap in other cheeses like cheddar, fontina, or a sharp Asiago for a different flavor profile. Experiment with different cheeses to find your perfect combination.
3. Add Extra Flavors
If you prefer a spicier sandwich, consider adding some pickled jalapeños or red pepper flakes to the olive salad. This will add a bit of heat that contrasts with the richness of the meats and cheese.
Tips for Perfect Muffuletta Sandwich
- Use Fresh Bread: Fresh bread is key to a great Muffuletta. Look for a round loaf that is crusty on the outside but soft on the inside. Avoid bread that is too dense or too soft, as it may not hold up well when pressed.
- Let the Sandwich Rest: Allowing the sandwich to chill for at least 20 minutes helps the flavors meld together and makes it easier to slice.
- Make It Ahead: The Muffuletta actually tastes even better the next day as the flavors have more time to develop. Make it the night before and refrigerate overnight for an even tastier sandwich.

The Classic Italian Muffuletta Sandwich: A Flavorful Feast of Italian Delights
- Total Time: 1 hour and 30 minutes
Description
Ingredients
For the Fried Chicken:
- 8 pieces of bone-in chicken (drumsticks or thighs): You can also use chicken breasts if preferred, but dark meat tends to be juicier.
- 1 ½ cups buttermilk: For marinating, buttermilk helps tenderize the chicken and adds flavor.
- 2 teaspoons hot sauce: For an added kick in the marinade.
- 1 teaspoon salt: To season the chicken and help draw out moisture.
- 1 teaspoon black pepper: Adds basic seasoning to the chicken.
- 1 teaspoon paprika: A smoky flavor enhancer.
- 2 cups all-purpose flour: For dredging the chicken to give it a crispy outer layer.
- 1 teaspoon garlic powder: To enhance the flavor of the coating.
- 1 teaspoon onion powder: Adds savory depth to the flour mixture.
- 1 teaspoon cayenne pepper: For an extra kick of heat in the breading.
- ½ teaspoon salt: For seasoning the flour mixture.
- Vegetable oil (for frying): Enough to cover the chicken in a deep fryer or large skillet.
For the Hot Honey Sauce:
- ½ cup honey: The star ingredient that balances the heat in the sauce.
- 2 tablespoons hot sauce: Adds the spiciness to the honey sauce. You can use a mild or hot sauce depending on your spice tolerance.
- 1 teaspoon chili flakes: For a bit of extra heat and crunch.
- 1 tablespoon apple cider vinegar: To cut through the sweetness and provide some tang to the glaze.
- ½ teaspoon smoked paprika: Adds a subtle smoky flavor to the sauce.
- Salt (to taste): To balance the sweetness and spice.
Optional Garnish:
- Chopped parsley or cilantro: For a fresh, herby touch.
- Extra chili flakes: For those who like it even spicier.
Instructions
Step-by-Step Preparation
First Step: Marinate the Chicken
- Prepare the Chicken: Begin by washing the chicken pieces and patting them dry with paper towels. This helps remove excess moisture, ensuring a crispier coating.
- Make the Marinade: In a large bowl, combine the buttermilk, hot sauce, salt, black pepper, and paprika. Mix everything together until the seasonings are well incorporated.
- Marinate the Chicken: Place the chicken pieces into the marinade, making sure they are fully submerged. Cover the bowl with plastic wrap and let the chicken marinate for at least 30 minutes, or up to overnight in the fridge. The longer it marinates, the more flavorful and tender it will become.
Second Step: Prepare the Flour Coating
- Combine the Dry Ingredients: In a large shallow bowl or plate, mix together the flour, garlic powder, onion powder, cayenne pepper, and salt.
- Dredge the Chicken: Remove the marinated chicken from the buttermilk, allowing any excess liquid to drip off. Then, dredge each piece in the seasoned flour mixture, ensuring that it’s fully coated. Press the flour onto the chicken to make sure it sticks well.
- Let the Chicken Rest: Once all the chicken pieces are coated, set them aside on a rack or a plate for about 10 minutes. This resting time allows the flour to adhere to the chicken better, ensuring a crispy coating when frying.
Third Step: Fry the Chicken
- Heat the Oil: In a deep skillet or large pot, heat enough vegetable oil over medium-high heat to submerge the chicken (about 2 inches deep). Heat the oil to 350°F (175°C), using a thermometer to monitor the temperature.
- Fry the Chicken: Carefully lower the chicken pieces into the hot oil, one at a time, to avoid splattering. Do not overcrowd the pan—fry the chicken in batches if necessary. Fry for about 10-12 minutes, turning occasionally to ensure that the chicken is golden and crispy on all sides. The internal temperature of the chicken should reach 165°F (74°C) for it to be fully cooked.
- Drain the Chicken: Once the chicken is done, transfer it to a wire rack or paper towels to drain any excess oil.
Fourth Step: Make the Hot Honey Sauce
- Prepare the Sauce: While the chicken is frying, combine the honey, hot sauce, chili flakes, apple cider vinegar, and smoked paprika in a small saucepan over low heat.
- Simmer the Sauce: Stir the mixture occasionally as it heats up. Let it simmer for about 2-3 minutes until the sauce is warmed through and the ingredients are well combined.
- Taste and Adjust: Taste the sauce and adjust the flavor if needed. If you prefer more heat, add extra hot sauce or chili flakes. For a sweeter sauce, add more honey.
Fifth Step: Glaze the Chicken
- Drizzle the Sauce: Once the chicken is fried and crispy, drizzle the hot honey sauce generously over the top of each piece. You can also dip the chicken in the sauce if you prefer an even coating.
- Garnish and Serve: Optionally, garnish the fried chicken with fresh chopped parsley or cilantro, and a sprinkle of extra chili flakes for added heat.
- Serve Hot: Serve the Crispy Southern Hot Honey Fried Chicken immediately while it’s still crispy and warm.
- Prep Time: 30minutes
- Marinating Time: 30 minutes
- Cook Time: 30 minutes
Nutrition
- Serving Size: 4-6
- Calories: 550 kcal
- Fat: 35g
- Carbohydrates: 30g
- Protein: 40g
Conclusion
The Muffuletta Sandwich is a delicious, flavorful, and hearty Italian-American creation that’s sure to satisfy any sandwich lover. With its rich combination of deli meats, cheeses, and tangy olive salad, it’s a sandwich that stands out for its complexity and bold flavors. Whether you’re preparing it for a special occasion, a casual picnic, or just as a delightful lunch, the Muffuletta is guaranteed to be a hit. Try this Halal-friendly recipe today and enjoy the perfect balance of savory, salty, and tangy flavors in every bite.