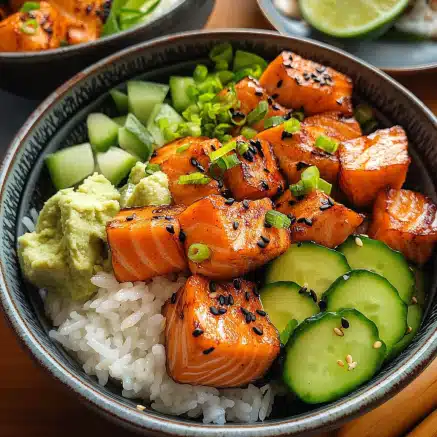

Sushi Cups are a fun and flavorful lunch idea that will elevate your lunchtime experience to new heights. If you enjoy sushi but seek a more accessible way to enjoy its deliciousness, sushi cups are your answer. These delightful creations capture all the wonderful flavors of traditional sushi while presenting them in a user-friendly format. They are not only delicious but also easy to prepare, making them the ultimate choice for busy weekdays or casual gatherings.
Imagine biting into a beautifully layered cup filled with seasoned rice, fresh vegetables, and your choice of protein, drizzled with savory sauces. Each cup is a unique flavor explosion that will tantalize your taste buds. Plus, they are visually stunning, making them perfect for impressing family and friends. In this article, you’ll discover why sushi cups are the lunch idea you didn’t know you needed, how to prepare them, and tips for serving them beautifully.
As sushi lovers ourselves, we understand the joy that comes from a delicious sushi roll. Still, we also recognize the challenges of making traditional sushi at home. Sushi cups simplify the experience and make it enjoyable for everyone, from novice cooks to seasoned chefs. So, let’s dive into the reasons you will love this recipe for sushi cups and how to create them effortlessly.
Why You’ll Love This Recipe
Sushi Cups offer a myriad of reasons to fall head over heels in love with them:
1. Simplicity: The preparation is straightforward, requiring minimal skill in the kitchen.
2. Customization: You can easily adjust the ingredients to fit your taste or dietary preferences, allowing for endless variations.
3. Healthy Meal Option: Packed with fresh veggies and lean proteins, sushi cups provide a nutritious meal that doesn’t compromise on flavor.
4. Fun Presentation: The cup format makes these sushi bites visually appealing, perfect for gatherings or picnics.
5. Quick Assembly: With cooked rice and prepped ingredients, you can whip these cups together in no time.
6. Perfect for Meal Prep: Sushi cups can be made in advance and stored, making them ideal for lunch during a busy week.
With these factors in mind, it’s easy to see why sushi cups are an amazing choice for any meal. They cater to various tastes, offer a fun eating experience, and present a beautiful array of colors and textures. You’ll find yourself reaching for these delightful cups time after time!
Preparation and Cooking Time
Preparing sushi cups will take about 30-45 minutes, depending on your efficiency and meal prep skills. Here’s a breakdown of the expected time:
– Preparation Time: 20-30 minutes for ingredient preparation and assembly.
– Cooking Time: 10-15 minutes for cooking any proteins and fluffing up the rice.
– Chilling Time: Optional, about 10-15 minutes if you prefer them slightly chilled before serving.
This timeline allows for a fun cooking experience without taking up your entire day, making it perfect for lunch or dinner.
Ingredients
– For the Rice:
– 2 cups sushi rice
– 2 ½ cups water
– ¼ cup rice vinegar
– 2 tablespoons sugar
– 1 teaspoon salt
– For the Filling:
– 1 cup cooked shrimp, chopped
– 1 cup cucumber, diced
– 1 cup avocado, diced
– ½ cup carrots, grated or julienne
– ¼ cup green onions, sliced
– ½ cup imitation crab meat, chopped (optional)
– For the Sauce:
– ¼ cup soy sauce
– 1 tablespoon sesame oil
– 1 tablespoon wasabi (optional)
– 1 tablespoon mayonnaise (optional for a creamy texture)
– For the Cups:
– Nori sheets, cut into squares (4×4 inches or similar size)
– Sesame seeds for garnish
Step-by-Step Instructions
Creating Sushi Cups is a rewarding experience that involves several easy-to-follow steps:
1. Prepare the Sushi Rice: Rinse sushi rice under cold water until water runs clear. Drain well.
2. Cook the Rice: In a rice cooker or pot, combine washed rice and water. Cook according to your rice cooker instructions or bring to a boil, then simmer and cover for 15-20 minutes until tender.
3. Season the Rice: In a small saucepan, combine rice vinegar, sugar, and salt. Heat gently to dissolve the sugar and salt. Once the rice is cooked, fold the vinegar mixture into it, fluffing the rice gently. Allow it to cool to room temperature.
4. Prep Fillings: While the rice is cooling, chop all your fillings: cooked shrimp, cucumber, avocado, carrots, and green onions. If using imitation crab, chop that as well.
5. Make Sauce: In a small bowl, mix soy sauce, sesame oil, and wasabi (if using). For a creamy option, mix in the mayonnaise.
6. Assemble the Cups: Take a nori sheet square and place a spoonful of sushi rice in the center. Press down gently to form a cup.
7. Fill the Cups: Add a layer of your chosen fillings and drizzle with the sauce. Add another layer of rice on top to secure everything.
8. Garnish: Sprinkle sesame seeds on top for added texture and flavor.
9. Chill (Optional): If desired, chill the sushi cups in the refrigerator for 10-15 minutes before serving.
With these steps, you’ll have beautiful sushi cups that are bursting with flavor!
How to Serve
Serving sushi cups can enhance their appeal and make them even more enjoyable. Here are a few tips for a delightful presentation:
1. Serving Platter: Use a beautiful serving platter or bamboo tray to display your sushi cups, creating a focal point for your table.
2. Dipping Sauces: Serve extra soy sauce or spicy mayo on the side for those who enjoy additional flavor.
3. Garnishes: Consider garnishing with extra green onions, sesame seeds, or small pieces of pickled ginger for added color and flavor.
4. Accompaniments: Pair with miso soup or a fresh seaweed salad as a light side dish.
5. Drinks: Offer green tea, sparkling water, or sake to complement the meal and enhance the overall experience.
Presenting sushi cups elegantly will not only make your meal more enjoyable but will also wow your guests, making it a memorable dining experience.
In conclusion, Sushi Cups are an amazing and ultimate lunch idea that combines fun, flavor, and flexibility. Whether you are entertaining friends, preparing a quick lunch, or looking to impress at a gathering, these cups are sure to be a hit. Dive into the world of sushi cups and let your creativity shine as you customize and enjoy this unique dish your way!
Additional Tips
– Use Fresh Ingredients: Whenever possible, opt for fresh seafood and vegetables for the best flavor and nutrition in your sushi cups.
– Experiment with Flavors: Don’t hesitate to try different proteins, sauces, or toppings to create your unique flavor combinations.
– Keep It Balanced: Aim for a good balance of flavors and textures in each cup. Some crunch from vegetables balances well with creamy avocado or proteins.
– Consider Texture: Adding toasted seaweed sheets or crunchy tempura bits can provide a delightful textural contrast to your sushi cups.
Recipe Variation
Feel free to customize your sushi cups according to your preferences! Here are a few variations to consider:
1. Vegan Option: Replace shrimp and crab with grilled tofu or marinated mushrooms and add an array of colorful vegetables.
2. Spicy Tuna Cups: Substitute cooked shrimp with fresh diced tuna mixed with spicy mayo and sriracha for a bit of heat.
3. Sushi Burrito Cups: Use larger nori sheets and stack the ingredients higher for a sushi burrito-style cup.
4. Tropical Twist: Incorporate tropical fruits like mango or pineapple along with the standard ingredients for a refreshing twist.
Freezing and Storage
– Storage: Sushi cups are best enjoyed fresh, but you can store any leftovers in an airtight container in the refrigerator for up to two days.
– Freezing: If you want to freeze sushi cups, consider freezing the rice and protein separately. Wrap them tightly in plastic wrap and store them in the freezer, where they will last for 1–2 months. Assemble the cups after thawing for the best texture.
Special Equipment
You don’t need much to create these delightful sushi cups, but having a few tools can make the process easier:
– Rice Cooker: A rice cooker can simplify cooking your sushi rice to perfection.
– Sharp Knife: For precise cuts of vegetables and proteins.
– Mixing Bowls: Use various bowls for different ingredients.
– Measuring Cups and Spoons: Ensure accurate measurements for your rice, liquids, and sauces.
– Nori Cutter or Scissors: Helps in cutting nori sheets into the desired size for cups.
Frequently Asked Questions
Can I use brown rice instead of sushi rice?
Yes, although it will change the texture and flavor. Brown rice may take longer to cook and will have a nuttier flavor.
What are some good protein alternatives?
You can use cooked chicken, tofu, or any seafood you prefer. The options are endless!
Can I make sushi cups ahead of time?
You can prepare the rice and chop the fillings in advance, but it’s best to assemble them close to serving to maintain freshness.
What can I serve with these sushi cups?
Serve with additional dipping sauces, edamame, or a light salad for a complete meal.
How do I customize the flavors further?
Feel free to add herbs, fermented vegetables, or different sauces to your fillings for added complexity.
Conclusion
Sushi Cups are not just a meal; they are a fun and interactive culinary experience. Their customizable nature makes them a perfect lunch option for any occasion. You can impress family and friends with your creativity while enjoying a healthy and delicious meal. Dive into this vibrant dish and explore the exciting world of sushi cups, inviting everyone to join in on the fun!

Sushi Cups: An Amazing Ultimate Lunch Idea You’ll Love
- Total Time: 35 minutes
Ingredients
– For the Rice:
– 2 cups sushi rice
– 2 ½ cups water
– ¼ cup rice vinegar
– 2 tablespoons sugar
– 1 teaspoon salt
– For the Filling:
– 1 cup cooked shrimp, chopped
– 1 cup cucumber, diced
– 1 cup avocado, diced
– ½ cup carrots, grated or julienne
– ¼ cup green onions, sliced
– ½ cup imitation crab meat, chopped (optional)
– For the Sauce:
– ¼ cup soy sauce
– 1 tablespoon sesame oil
– 1 tablespoon wasabi (optional)
– 1 tablespoon mayonnaise (optional for a creamy texture)
– For the Cups:
– Nori sheets, cut into squares (4×4 inches or similar size)
– Sesame seeds for garnish
Instructions
Creating Sushi Cups is a rewarding experience that involves several easy-to-follow steps:
1. Prepare the Sushi Rice: Rinse sushi rice under cold water until water runs clear. Drain well.
2. Cook the Rice: In a rice cooker or pot, combine washed rice and water. Cook according to your rice cooker instructions or bring to a boil, then simmer and cover for 15-20 minutes until tender.
3. Season the Rice: In a small saucepan, combine rice vinegar, sugar, and salt. Heat gently to dissolve the sugar and salt. Once the rice is cooked, fold the vinegar mixture into it, fluffing the rice gently. Allow it to cool to room temperature.
4. Prep Fillings: While the rice is cooling, chop all your fillings: cooked shrimp, cucumber, avocado, carrots, and green onions. If using imitation crab, chop that as well.
5. Make Sauce: In a small bowl, mix soy sauce, sesame oil, and wasabi (if using). For a creamy option, mix in the mayonnaise.
6. Assemble the Cups: Take a nori sheet square and place a spoonful of sushi rice in the center. Press down gently to form a cup.
7. Fill the Cups: Add a layer of your chosen fillings and drizzle with the sauce. Add another layer of rice on top to secure everything.
8. Garnish: Sprinkle sesame seeds on top for added texture and flavor.
9. Chill (Optional): If desired, chill the sushi cups in the refrigerator for 10-15 minutes before serving.
With these steps, you’ll have beautiful sushi cups that are bursting with flavor!
- Prep Time: 15 minutes
- Cook Time: 20 minutes
Nutrition
- Serving Size: 4
- Calories: 350 kcal
- Fat: 10g
- Protein: 12g